Sunday, February 26, 2012

Eggs Benedict

Eggs Benedict make any meal an elegant special occasion. This egg dish is specially great for weekend breakfast or brunch, or a unique evening meal.
Eggs Benedict Eggs Benedict

Learn about the history of Eggs Benedict. Also learn all about Eggs and how to cook them, and for more great brunch ideas, check out my Brunch Recipes.

Eggs Benedict Recipe
Recipe Type: Eggs, Ham, Brunch & Breakfast
Yields: 4 servings
Prep time: 15 min
Cook time: 15 min
Ingredients:
2 English muffins, halved horizontally
4 slices baked ham or Canadian bacon
4 whole eggs for poaching
2 tablespoons distilled white vinegar
2 teaspoons coarse salt or Fleur de Sel Salt*
Hollandaise Sauce (see recipe below)
Parsley or chives, for garnish
* The Fleur de Sel Salt is fabulous on eggs.
NOTE: Check out my web page on How To Poach Eggs with lots of hints and tips.
Preparation:
Toast English muffin slices under the broiler or in the oven for approximately 3 minutes or until golden brown. Remove from broiler, spread with 1 teaspoon butter. In a large frying pan, cook ham or Canadian bacon slices until lightly browned and place them on each English muffin half.
Use a pan that is at least 3-inches deep so there is enough water to cover the eggs and they do not stick to the bottom of the pan. NOTE: To prevent sticking, grease the pan with a little oil before filling with water. Add vinegar and salt to the poaching liquid; bring the poaching liquid to a boil and then reduce to a simmer before adding the eggs (bubbles should not break the surface).
HINT: When you poach eggs, adding a little vinegar and salt to the water will helps the egg to hold its shape. Without it, the eggs will become skeins of protein tangling up in the water.
Break each egg onto a saucer or into small cups or bowls. Slip eggs carefully into simmering water by lowering the lip of each egg-cup 1/2-inch below the surface of the water. Let the eggs flow out. Immediately cover with a lid and turn off the heat. Set a timer for exactly three minutes for medium-firm yolks. Adjust the time up or down for runnier or firmer yolks. Cook 3 to 5 minutes, depending on firmness desired.
Remove from water with slotted spoon. Lift each perfectly poached egg from the water with a slotted spoon, but hold it over the skillet briefly to let any water clinging to the egg drain off. Drain well before serving. Top each English muffin half with one poached egg. Spoon warm Hollandaise Sauce over eggs and garnished with a small parsley sprig or chopped chives.
Variation Ideas:
Smoked Salmon - Substitute thinly sliced smoked salmon for the ham.
Artichoke - Substitute cooked artichoke heart for English muffin.
Makes 4 serving.

Poaching eggs for a crowd:
To poach eggs for a crowd, cook eggs ahead of time, slightly undercooking them. Slide them into a large bowl of cold water. When ready to be served, immerse in barely simmering water for 1 to 2 minutes.
Holding poached eggs for a short period of time:
If you are making eggs only a short while ahead, slide all of them, as they are cooked, into a large bowl of hot (not boiling) water. Don't worry about them sticking together. Top with more hot water from time to time to keep them warm. The eggs will be soft, warm, and ready to eat when you are ready to serve them.
Hollandaise Sauce:  3 egg yolks
1 tablespoon freshly-squeezed lemon juice
1/4 pound (1/2 cup) unsalted butter, cut into pieces
1/2 cup white wine
1 tablespoon white vinegar
Coarse salt and pepper to taste
* If you use salted butter, delete the salt from the recipe.
Stir egg yolks and lemon juice vigorously in medium saucepan over very low heat. Add butter and white wine and stir constantly with whisk, until melted. Add white vinegar, salt, and pepper and continue vigorous stirring until all butter is melted and sauce is thickened (be sure butter melts slowly so eggs have time to cook and thicken sauce without curdling). NOTE: If the sauce begins to separate, add 2 teaspoons of water to the sauce mixture and whisk briskly until the mixture has combined together to form a creamy sauce.
Keep warm until ready to serve. HINT: I put my Hollandaise Sauce in a small thermos to keep warm.
Quick and Easy Hollandaise Sauce: Use 1 package Knorr Hollandaise Sauce mix and follow package directions.

Deviled Egg

The best eggs for poaching are the freshest eggs you can find. If eggs are more than a week old, the whites thin out. Whites of fresh eggs will gather compactly around the yolk, making a rounder, neater shape.
(1) I like to poach my eggs in a wide shallow pan. Use a pan that is at least 3-inches deep so there is enough water to cover the eggs, and they do not stick to the bottom of the pan. Also make sure your pan is wide enough to hold all the eggs you will be poaching, as you don't want the eggs to stick together. NOTE: I like to use a non-stick pan so the poached eggs will not stick to the bottom of the pan.
(2) Working with the eggs, one by one, break or crack each egg onto a saucer, ramekin, small cups, or bowls. We're doing this for two reasons: So you won't break the yolk and it prevents adding bad eggs. Place all cups of eggs so that they are convenient to the stove.
(3) If the water is too cool, the egg will separate apart before it cooks; if your water is too hot, you will end up with tough whites and an over-cooked yolk.
Water Temperature: You will want to bring the water to a temperature of about 160 to 180ºF (71-82ºC). As a rule of thumb, bring the water to a boil, then reduce it to a simmer before cooking.
To obtain the correct temperature, spin the boiling water with a spoon to cool down the water before you drop in the egg. I like to use my instant-read thermometer to test the water temperature (adjust heat to maintain the proper temperature).
Do not drop the egg into boiling water (212ºF or 100ºC). This will negatively affect the taste and texture of your eggs.
Do not add salt, which would do the opposite and loosen the whites.

Pros and Cons of Using Vinegar:

by Alice Medrich.
The usual problem with eggs is that the whites often end up too firm or tough by the time the yolks are ready. This is because egg whites are mostly protein, and protein starts to set (coagulate) as soon it meets heat. Yolks cook slower to begin with, and even more slowly when they are surrounded by their whites. Adding vinegar to poaching water makes the whites firm even faster to prevent them from dispersing in the water. But that extra firmness comes with a slightly grainy texture and an odd flavor. I want my poached eggs with lovely tender yolks and whites. So I say, hold the vinegar.
Placing uncooked eggs in poaching water(4) Slip eggs carefully into slowly or gently simmering water by lowering the lip of each egg cup 1/2-inch below the surface of the water.
Let the eggs flow out. Don't put too many eggs in the pot at one time. If the yolk breaks as you crack the egg or as you are putting the egg in the water, that egg is a goner. Pull it out and use it for something else or perhaps someone wants scrambled eggs instead.
With a spoon, gently nudge the egg whites closer to their yolks.
Immediately cover with a lid and turn off the heat. Don't disturb the egg/eggs once you have put it in the water!

Hints to keep the eggs contained:

Egg Rings - Use an egg ring in a flat bottomed pan. Drop the egg over the mason jar ring and let it settle in the ring, then turn off the heat, and cover.
Mason Jar Rings - Use a ring from a mason jar and place it in the pan. Drop the egg over the mason jar ring and let it settle in the ring, then turn off the heat, and cover.
Tuna Cans - Remove the top an bottom off a small washed tuna can and place it in the pan. Drop the egg over the mason jar ring and let it settle in the ring, then turn off the heat, and cover.
Plastic Wrap - Take a piece of plastic wrap and lay it over a coffee mug, pushing the plastic down into it a bit. Then crack an egg into the plastic wrap and tie/twist the ends together tightly. NOTE: Leave a little air in the egg packet and maybe a drop of water.
Drop the egg bag into the hot water. Let cook approximately 2 to 4 minutes depending on how hot your water is and the size of the eggs.
When done, take your eggs out of the water with a pair of tongs or a slotted spoon. Cut off the plastic wrap and serve.

(5)
Set a timer for exactly 3 minutes for medium-firm yolks. Adjust the time up or down for runnier or firmer yolks. Cook 3 to 5 minutes, depending on firmness desired. You can test for softness/firmness by lifting an egg on a spoon and gently pressing a finger on the yolk.
(6) Remove from water with slotted spoon. Remove each egg in succession after they have each cooked for the doneness you want. NOTE: Keep track of which egg went into the water first and remove in the same order.
Lift each perfectly poached egg from the water with a slotted spoon, but hold it over the skillet briefly to let any water clinging to the egg drain off. Drain well before serving.
Optional: Put the finished poached eggs in a bowl of cold water. This stops the cooking.
(7) To serve best-quality poach eggs, the poached eggs should be served as soon as they are pulled from the water and drained. They cool down quickly and once cold, they're not as desirable for the diner.
Egg poaching in simmering water
Finished poached egg
Recipe Ideas Using Poached Eggs:
Artichoke Benedict
Artichoke Benedict
Not the traditional way, but a very beautiful way to serve Eggs Benedict.
Asparagus with Poached Eggs & Shaved Parmesan
Asparagus with Poached Eggs and Shaved Parmesan
My husband loves this dish! He looked at me funny when I first served it to him, but he loved it! He said I could make this anytime. It would make a wonderful luncheon dish. I have also served this asparagus dish as a side dish for my gourmet dinner group.
Burgundy Salad with Poached EggBurgundy Salad with Poached Egg

This is a classic French salad from Burgundy, France. This recipe has been adapted from a recipe from the famous Hotel Barge La Reine Pedauque (a luxury hotel barge that cruises on the Burgundy Canal in France). It is a perfect lunch salad or served as an appetizer. Everyone you serve this delightful salad to will want the recipe.
Croque Madame Egg Sandwich
This breakfast-style sandwich is good anytime of the day. Especially for breakfast or brunch. This is a French version of the American grilled cheese sandwich with the difference being the egg on top of the sandwich. The Croque-Madame was invented in Paris sometime around 1910 as a fast food to be eaten in cafes and bistros. According to some historians, this sandwich is called a Croque Madame because the fried egg on top is reminiscent of a ladies hat.
Eggs BenedictEggs Benedict
Eggs Benedict make any meal an elegant special occasion. This egg dish is specially great for weekend breakfast or brunch, or a unique evening meal. I often cheat on making the Holllandaise Sauce and use the Knorr Hollandaise Sauce mix (know ones seems to notice).
Eggs Benedict - low fat
Now you can have Eggs Benedict without all the fat!
Pasta with Poached Eggs and Truffle Oil
This pasta dish will give your taste buds a wonderful sensation! This could be considered an aphrodisiac dish because it is so sensual. Don't miss making this wonderful pasta dish. Serve it at your next dinner party.
Poached Eggs and Tomato on Potato Pancakes
This recipe is basically a version of Eggs Benedict using potato pancakes instead of English muffins.
perfect poached eggPoached Eggs on Toast
Poached Eggs on Toast is the perfect breakfast. It fills you up and also providers the protein needed for your body.
Spring Greens with Poached Egg
This is a classic French recipe. This salad makes a perfect lunch or a great appetizer. Everyone you serve this delightful salad to will want the recipe.


Poaching Eggs For A Crowd:
To poach eggs for a crowd, cook eggs ahead of time, slightly undercooking them. Slide them into a large bowl of cold water. Place in the refrigerator and leave until it's time to serve - they keep well for up to a day in the refrigerator.
When ready to be served, drop them into a pan of simmering, salted water for 20 to 30 seconds (and no more than one minute) and they're ready to serve immediately.
If you are making eggs only a short while ahead, slide all of them, as they are cooked, into a large bowl of hot (not boiling) water. Don't worry about them sticking together. Top with more hot water from time to time to keep them warm. The eggs will be soft, warm, and ready to eat when you are ready to serve them.

Meringue

Makes about 10 large ones.

Perfect meringues

Ingredients

300g caster sugar (golden if you prefer a more caramelized flavour and color)
5 eggs, whites only, at room temperature
Lemon slice (optional)


Directions

1. Heat the oven to 200C. Spread the sugar over an oven tray lined with baking parchment and cook until it has just begun to melt at the edges, but not caramelize (about 8 minutes).

2. Meanwhile, crack the eggs, being careful not to drop any yolk into your whites. If you lose any bits of shell, scoop them out with a clean spoon rather than your fingers.

3. Wipe the inside of your mixing bowl, and the whisk, with the cut side of the lemon and add the eggs. As soon as you spot the sugar beginning to melt at the edges, set the mixer to whisk at high speed while you take the sugar out of the oven.

4. The mixture should be just foamy by the time you add the sugar. Wearing oven gloves, pick up the baking parchment with oven gloves and tip the hot sugar slowly into the still-whisking mixer. Continue whisking until the mixture has cooled, and is glossy and will hold its shape. Turn the oven down to its lowest setting.

5. If you want to fold through any spices or other flavorings, or roll the meringues in nuts or another topping, this is your moment – but they'll be pretty good as they are.

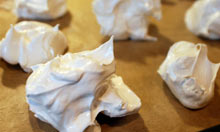
  6. Line a baking tray with parchment, and spoon the meringue on in great gorgeous blobs – remember they'll increase in size as they dry out. Put them into the oven and bake until they are crisp on the outside, and sound hollow when tapped on the bottom: depending on their size, this could take six hours, so don't wait up.

7. Turn the oven off and leave them in there until it has cooled, then immediately transfer to an air-tight container.

http://www.guardian.co.uk/lifeandstyle/wordofmouth/2010/aug/19/how-to-make-perfect-meringue


Egg-White Whipping Stages
  • Foamy: Large bubbles, very loose with a cloudy, yellowish liquid developing into bubbles.
  • Soft Peaks: Bubbles have tightened into a white foam with a ribbon that folds back into itself. You can pull the whites into a "peak" but they won't hold one.
  • Firm Peaks: Glossy, firm and smooth. You can pull whites into a peak that will curl but not stand.
  • Stiff Peaks: Glossy and very stiff. Peaks are stiff enough to "cut."

When beaten, egg whites can expand to up to eight times their original volume. Sugar not only adds sweetness, it also stabilizes the egg whites by coating them with sugar so they can be beaten longer and don't dry out as fast. Sugar also decreases the volume and lightness of the meringue, so it is important that the sugar be added gradually, and usually never before the egg whites have been whipped to at least four times their original volume
You should beat the egg white until the just hold their peaks but will gently fold over not flop over

Try putting in a pan of water under the cookies when baking in the oven. This really helps in baking cakes, cookies, cheesecakes

Ok sounds like your not beating the egg white enough in the first place. It should to soft peak not hard peaks. I make meringue desert shells and it's just about the same. You should beat the egg white until the just hold their peaks but will gently fold over not flop over. It sounds like your not getting enough air into the meringue in the first place so they can't dry out when you bake and cool them. If your keep them in your oven to dry than you should not open the oven door at all. Just keep it closed until they are dried out. My desert shells usually dry with in 4 to 6 hours. Then I store them in a zip lock bag or some other air tight container. They don't last too Long here though.
Here's the recipe I use for cookies!
2 large egg whites, at room temperature
1/2 teaspoon cream of tartar
2/3 cup superfine granulated sugar
1 teaspoon vanilla extract
1 cup semisweet chocolate chips or finely chopped semisweet chocolate
1 cup finely chopped walnuts
Preheat the oven to 350 degrees F and line 2 baking sheets with parchment paper. Set aside.
In the bowl of an electric mixer, beat egg whites until foamy. Add the cream of tartar and beat until fluffy but not at all dry. (Be careful not to over beat.) Add the sugar gradually, about 3 tablespoons at a time. When 1/2 of the sugar has been added, add the vanilla extract. Continue beating and adding remaining sugar in batches, until all of the sugar is dissolved and the meringue is very shiny and tight. Gently fold in the chocolate chips and chopped nuts. Working one teaspoon at a time, push a teaspoonful of meringue from the tip of 1 teaspoon with the back of another teaspoon onto the lined baking sheets, leaving 1-inch of space between cookies. Place baking sheets in the preheated oven and turn the oven off. Leave the cookies (undisturbed) in the oven for at least 2 hours and up to overnight, or until cookies are crisp and dry.

Whipping egg whites are much like blowing air into a balloon. Beating or whisking causes the protein in the egg whites to unfold, forming films that trap the air bubbles, and the sugar stiffens the foam. A meringue is really nothing but a foam, and foam is a big collection of bubbles. Fat interferes with the formation of a good foam in the egg whites. Fats tend to collapse merengue

Tips For Meringue Success
  • When making meringues, always cook egg whites or use purchased pasteurized egg whites to avoid salmonella poisoning.
  • Use fresh egg whites. Old egg whites tend to collapse when other ingredients are folded in, and they don't rise well in the oven.
  • Use eggs at room temperature if possible. Cold egg whites tend to reduce meringue volume.
  • Never let any yolk get into the whites.
  • Don't overbeat egg whites. (Overbeaten egg whites will look hard, lumpy or dry). When whipping egg whites, always start your mixer on medium-low to medium speed. Beat them until foamy and increase the speed to medium-high and then to high. If the egg whites are beaten too quickly at the beginning, the structure of the foam will not be as strong, and later the egg whites will not beat as high as they should.
  • A small amount of cream of tartar or vinegar can be added to the mixture at the beginning of whipping to help stabilize the foam and make it less likely to collapse.
  • Don't use plastic bowls – they can retain a film of fat from previously mixed or stored items that can deflate the meringue.
  • Don't make meringues on humid days. Humidity causes meringues to be sticky and chewy.
  • Bake meringues at low temperatures because they tend to brown quickly.
  • Leave hard meringues in the oven after baking so they will cool slowly and not crack.

Egg White Meringue - How To Make Perfect Meringue

meringue on top of pie

Whipping egg whites are much like blowing air into a balloon. Beating or whisking causes the protein in the egg whites to unfold, forming films that trap the air bubbles, and the sugar stiffens the foam. A meringue is really nothing but a foam, and foam is a big collection of bubbles. Fat interferes with the formation of a good foam in the egg whites. Fats tend to collapse egg foams.


Age of Eggs:

Meringue recipes work better with eggs that are at least 3 or 4 days old. Thin, older egg whites whip more easily to a higher volume than thick, fresh egg whites. Once whipped, the foam from thin whites is less stable because the liquid film drains more easily from the bubbles. If volume is more important than stability, then older eggs are better to use. For better stability, a good rule of thumb is to use fresher eggs for meringues, saving older ones for general baking.

Don't make egg white meringues on a rainy or really humid day (remember that they are mostly air and if that air contains a lot of water, it will have an effect).


Separating Eggs:

Cold eggs separate more easily than those at room temperature because the whites hold together better.

  • separating egg yolk and egg whiteTo separate an egg: Crack the egg and hold the shell halves over a bowl. Transfer the yolk back and forth between the halves, letting the white drop into the bowl. Do not cut the yolk (whites containing any yolk will not beat properly). Transfer the yolk to another bowl.
  • The tiniest bit of fat or egg yolk will wreck a meringue, as fat interferes with the formation of good foam. When separating eggs, if a speck of egg yolk falls into the egg whites, lift it out with an empty eggshell half. Do not try to fish it out with your fingers; the oil on your skin will prevent the egg whites from expanding.
  • Avoid letting your fingers touch the areas that will come in contact with the egg whites. That way, you'll avoid leaving oils from your hands on the utensils you just washed.

After separating, bring egg whites to room temperature to ensure volume when beating (as warmer eggs whip faster than cold eggs). Egg whites right out of the refrigerator will not whip well. The ideal temperature to whip a common meringue is room temperature, about 70 degrees F. (21 degrees C.). Usually 30 minutes is adequate to obtain room temperature.
A beaten egg white can foam to 6 to 8 times its original volume if the egg whites have been at room temperature for 30 minutes before beating.


Bowls and Utensils:

Copper, stainless-steel, or glass bowls work best for making meringues. Avoid using plastic bowls for whipping egg whites as they can often harbor traces of grease or fat, which prevents the whites from getting stiff. Whichever type of bowl you use, be sure it is spotlessly clean.

Make sure that all your utensils are immaculately clean, completely grease-free, and completely dry. Meringues are very sensitive and they don't like any moisture.

Place the egg whites into a large, tall bowl and set your mixer to medium-high speed. NOTE: I would not hand beat a meringues (too much work). Beating or whisking causes the protein in the egg whites to unfold, forming films that trap the air bubbles, and the sugar stiffens the foam. As the mixing time increases, the bubbles become smaller and more numerous; this increases the volume and makes a more-stable structure.


Adding Sugar:

Do not add sugar before whipping the egg whites. Adding sugar at the beginning can double the time you have to whip the egg whites to get a foam. Add the sugar at the very end when the whites have formed soft peaks.

I like to use superfine sugar when making meringue because it dissolves faster than table sugar. When beating egg whites and the recipe calls for sugar, Gradually add the sugar, a few spoonfuls at a time and beating the whole time.

As a general rule, add a total of 1/4 cup of granulated or superfine sugar for each egg white. Do not make meringues that have less than 2 tablespoons of sugar per egg white. If you use any less, the foam will not set and the meringue will shrink.

To tell if the sugar is dissolved when you are beating egg whites for meringues, rub a bit of the foam between your fingers. If it feels gritty, the sugar is not dissolved, so keep beating for a few minutes.

By varying the amount of sugar in the final mix, you control how hard or soft the final meringue will be:
beating egg white - stiff peaksFor soft peaks - place egg whites in a clean glass or metal bowl (not plastic), and beat with an electric mixer on medium speed or with a rotary beater until egg whites form peaks with tips that curl over when the beaters are lifted. For stiff peaks, continue beating egg whites on high speed until they form peaks with tips that stand straight when the beaters are lifted.

For stiff peaks
- continue beating egg whites on high speed until they form peaks with tips that stand straight when the beaters are lifted.

Once you start a making whipped egg whites, continue it straight through and finish it off. Do not stop halfway to take a break.

The meringue is done when it is not runny and when you can hold a spoonful of it upside down and none of it drops off. Also when you swirl a spoon through it and the swirls hold their shape indefinitely.


Using Meringue:

Make the meringue first - then prepare the filling (such as pie filling).

Place meringue on the piping-hot filling to begin cooking the bottom of the meringue. The residual heat carried by the filling cooks the base of the meringue ever so slightly, making it less prone to leaking or shrinking.


Baking Meringue:

Meringues will become more done if you bake them at a lower temperature for a longer time. Bake at 325 degrees for 20 to 30 minutes.

baked meringue

lemon meringue pie piece


Cutting Meringue:

To cut baked meringue into serving pieces, use a knife dipped in cold water.


Storing Meringue:

There is no simple solution to this problem to the problems of storing a meringue-topped pie. This type of pie is best served the day it is made.

Remember, meringue pies only last a day or two, and then the meringue starts breaking down. If you place any cooked meringue in the refrigerator (no matter how long you baked it), it will bead and weep. Prepared meringue pies should be stored under an inverted bowl at room temperature.

However, custard and cream meringue-topped pies (especially when using eggs in the filling) always have to be kept refrigerated because the filling is perishable. Any pie containing pumpkin, custard, or cream pies are very good breeding grounds for bacteria.
So what to do - You can make the pie filling up to two (2) days before serving, but it's best to make the meringue the day the pie is served.
The best solution is to make the pie filling the day before you want to serve the pie and store it in the refrigerator. Then the day you want to serve and eat the pie, make the meringue and put it on top of the pie.

Storage
  • Meringue pie should be refrigerated in a cake dome.
  • Baked meringues should be stored in airtight, moisture-free containers. They can usually keep for a week at room temperature and up to a month in the freezer.
Meringue Types

A simple, uncooked meringue is made by beating egg whites, and adding in sugar until very stiff, shiny peaks form. Due to concerns about possible bacteria in raw eggs, powdered egg whites or pasteurized eggs found in the refrigerated section of your grocery store are recommended.

Italian and Swiss meringues are cooked. French meringue is baked.

Italian meringue is made by slowly beating hot sugar syrup into stiffly beaten egg whites and is used in frostings and atop pies and cakes.

Swiss meringue is made by dissolving sugar and egg whites together over simmering water and then beating in an electric mixer. It is often used as a base for buttercream frostings.

French meringue is made by gradually adding ultrafine sugar to whipped uncooked egg whites until the whites form stiff, shiny peaks. The meringue is then piped into shapes and baked. It has a light, crisp texture and is often used as a "nest" to hold fruit or sorbets.

Sweet Fact: You need at least 1-1/2 tablespoons of sugar per egg white to get a stable meringue.

Sweet Fact: French (hard) meringue = 4 tablespoons of sugar per egg white.

Sweet Fact: Italian (soft) meringue = 2 tablespoons of sugar per egg white.

Tip
  • Add a tablespoon of cornstarch dissolved in heated water to whipped egg whites for a hard meringue that cuts smoothly.

Stabilisers

One of the golden rules of meringue making is that all of your equipment must be scrupulously clean, without a speck of grease, or it will be much more difficult (although not impossible, as is often claimed, according to the food chemist, Hervé This) to produce the desired foam with your ingredients. Marcus Wareing suggests rubbing your mixer bowl with half a lemon before beginning, to eliminate any last specks of fat before you beat the egg whites, which is an excellent idea. There's nothing sadder than a baking failure.

There are other tricks the cunning chef can employ to improve the chances of achieving a stable foam. The most common is adding a little acid, such as vinegar, more lemon juice, or cream of tartar, to the mixture, after the sugar. According to Larousse Gastronomique, this also helps to make it "crisp on the outside, soft and sticky on the inside".
Using Marcus Wareing's "perfect" recipe as my control, I make two batches of meringues. Both use the whites of 3 large eggs, whisked to soft peaks in the food mixer (unless you're a masochist, meringues are not something to be attempted by hand), and 200g caster sugar, added in spoonfuls between the soft and stiff peak stage. One is finished off with a pinch of cream of tartar, as suggested by Leiths Baking Bible, then both are spooned onto lined baking trays, and go into the oven at 100C for an hour and a half, until crisp. The cream of tartar meringues seem to have slightly stiffer peaks, and, when cooked, are more uniformly crunchy.

Technique

Most recipes call for the sugar only after the whites have been whipped to soft peaks – add it too early and you can kiss goodbye to a good strong foam. Yotam Ottolenghi, the capital's supreme meringue maker, has a different suggestion, however. In his first book, Ottolenghi, he gives a recipe which calls for the sugar to be heated to 100C before being added to very lightly whisked eggs which have "just begun to froth up". The whole is then whisked on top speed for 10 minutes, until the mixture is cool, and holds its shape.

It takes me a couple of goes to master this technique, which is like a cross between a French and an Italian meringue – my sugar keeps caramelising, and thus solidifying in the mixer bowl, but a few sacrificed eggs later, I think I've cracked it. The meringues on the baking tray look magnificent: as craggy and towering as the much-admired originals, but when I take them out of the oven, they've gone an odd shade of orange. They taste good, and they're easier to shape than the traditional recipe but the colour is very definitely off.

Using white sugar improves matters slightly, but they're still not fit for a shop window. (Interestingly, with this recipe, I can't detect a difference using cream of tartar, presumably because the make-up of the foam is slightly different when hot sugar is used.)

Temperature

Advice online suggests that my orange meringues may simply have been on a too high a temperature. Wedging the oven door open with a rolled-up tea towel or a wooden spoon, to prevent it overheating, is apparently one solution. Inconveniently, I seem to have the kind of oven that doesn't much feel like cooking when the door is open, so I'm not sure what to do.

I explain my dilemma to Peter Tar, a pastry chef for Tom Aiken, and meringue connoisseur. He shakes his head. "100C is too high. You need to put them in at 60C, 70C, overnight." You don't cook meringues so much as dry them out, apparently; evaporating the water to leave only the rigid structure of the egg and sugar mix, and the air bubbles in between. I try Ottolenghi's method, in the oven at its lowest setting, leave them for six hours, and the results are positively snowy. I feel extremely proud of myself: a proper meringue is a beautiful thing.

Торта с маслен крем

от Севда Латинова

Продукти за торта с 3 блата, сиропирана, с маслен крем.
9 яйца
4 жълтъка
125г масло
550г захар + 2чч
225г брашно +5 сл
1л мляко
Блатове
За 1 блат (за 3 блата рецептата се утроява)
3 яица
75г брашно (по 25г на яйце)
75 г захар (по 25г на яйце)
Приготовление
!!!! В СУХ съд, белтъците и захарта се разбиват натвърд сняг на бързи обороти на миксера . После на бавни обороти постепено се добавя брашното.
Изсипва се в тавичка с мазна хартия за печене на дъното. Пече се на 180С за 8-10 мин.
Изважда се и се обръща с хартията нагоре върху скара за да изстине на въздух а не да се запари. Хартията се маха, оставя в тавата и се намазва – готова за следващия блат.
Правят се 3 блата.
Сироп
за 3 блата
2чч вода се завира с 2чч захар. Оставя се да изстине.
Маслем н крем 1 мляко (4чч)
300г захар
5 сл брашно
4 жълтъка
125г масло
2-3сл захар с връх

Захарта брашното и жълтъците се разбиват с малко от студеното мляко.
Прецеждат се.
Останалото мляко се оставя да заври. Добавя се към горната смес на тънка струйка за да не пресече жълтъка. Поръсва се със захар за да не хване коричка и се оставя да изстине напълно.
Маслото – 125г, стайна температура, се разбива до побеляване с 2-3 сл с връх захар,
Двата крема, напълно изстинали, се смесват като се бърката с миксера на бавни обороти.
Блатовете се подреждат с “дъното”нагоре  един по един и се сиропират.
Украсява се по желаие.

Saturday, February 25, 2012

Торта с крем

от Кремена Андонова
2 блата
орехи
за сиропа 1 чч захар
1 ванилия
1 чч вода
За крема
2чч мляко
1/2 захар
5 сл брашно
2 ванилии
3 жълтъка
1 пакет масло

Сироп
Оставя се  1чч вода да заври и се добавят 1чч захар и 1 ванилия.  Разбърква се до пълно разтваряне. Оставя се на хладно да изстине.
Крем
Брашното – 5сл, се разтваря в 1/2 чч студено прясно мляко. Прецежда се.  Останалото мляко – 1,1/2 чч се вари на слаб огън и постепено се добавя  1/2 чч захар, 1 ванилия и после постепено студената смес от брашно и мляко. Непрекъснато се бърка с шпатула. Много лесно се залепя по дъното.
3 жълтъка 
1 пакет масло
2 ванилии
Разбърквата се трите жълтъка с маслото, и ванилията
Добавя се към вече изстиналия крем като се бърка в една посока. Оставя се да изстине
Блата се полива със сироп, покрива се с крем – така се редуват. Отгоре се украсява по желание.

Сръбска питка

От Ангелина
2ч.ч. пшенично брашно
2ч.ч. царевично брашно
1ч.л. сол
1 бакпулвер
1ч.ч. кисело мляко
3 яйца
300 г натрошено сирене
100 мл. олио
Всичко се забърква с лъжица. Изсипва се върху тавичка с намаслена хартия за печене.
Пече се за около 35 мин на 220 градуса.

Пандишпанов блат за торта

за един блат:
2 яйца
1 ч.ч. захар
1 ч.ч. + 1 с.л. брашно
7 с.л. вода
1 равна ч.л. бакпулвер
2 бр. яйца
180 г захар
160 г брашно тип 500
7 сл вода
1/2 пак. бакпулвер
за 3 блата
4 яйца
1 и 1/2 ч.ч. захар
2 ч.ч. брашно
ванилия
масло за намазване на формата

ароматизатор по усмотрение (ванилия, настъргана лимонова/портокалова кора, или някаква есенция)
Отделят се белтъците от жълтъците. Белтъците се разбиват на сняг с щипка сол. Жълтъците се разбиват отделно със захарта и водата. Към тях се прибавя брашното, пресято заедно с бакпулвера. Накрая внимателно се прибавят белтъците.
Сместа се изсипва в намаслена и поръсена с брашно форма / тава.
Блатът се пече във фурна загрята на 220С/450F градуса, докато леко порозовее и клечка, забодена в средата не излезне суха, без полепнало по нея тесто.
Готовият блат е висок 3,5 - 4 см с диаметър 22 см. Ако се пече в микровълнова (5 мин под капак на 750 W и още 4 на 400 W (без капак) става поне 6 - 6,5 см.)

Забележка
: едната с.л. брашно може да се замени с 1 с.л. какао или някакви ситносмлени ядки.
С това тесто правя основа за плодова торта, която пека в тази форма. Готовата торта може да се оформи така.
За средноголяма торта (с диаметър около 26 см) е достатъчно да се изпекат два такива блата и да се разделят на половинки.
Източник: Дина Тодорова
Шантили, приготвен по следния начин: сметаната се охлажда в хладилник най-малко за два часа
5. Разбива се с миксер, докато сместа стане гъста и плътна, след което й сеприбавят 150 г захар и ванилия

Saturday, February 11, 2012

Пиле

Съвети

Пилетео се пече се 40 минути за всеки 1kg, ( 20 min fir 1 lb.) като добавите още 15 минути за цялостно изпичане.
Ако например пилето е 2 kg, ще бъде необходимо да печете 80 минути на 180 градуса, След което се маха фолиото и се пече още 15 мин. за да хване златиста коричка. Така времето, необходимо за приготвянето на сочното пиле, ще е 1 час и 35 минути
Като видиш, че са му се оголили кокалите, значи се е опекло, и като го боцнеш с вилица, ако се вади месце-значи се е опекло.
1. Има два варианта за подготовката на пилето преди готвене. Първият е да приготвите саламура от сол и вода и да поставите пилето в нея за няколко часа. Солта ще направи пилето значително по-крехко, тъй като ще позволи на водата да се абсорбира от месото. Другият вариант е да го мариновате в масло/зехтин и подправки, което също добавя сочност на пилето. Този вариант се препоръчва при по-малки бройлери (или части от него). Избраните от вас билки ще подправят по уникален начин ястието.
В никакъв случай по време на изпичането на бройлера не го бодете с вилици или нож, тъй като ще позволите на маринатата и попитата влага бързо да се изпари
5. След изваждане на пилето майсторите готвачи препоръчват за около 15 минути да го оставите „на обратно“ – гърдите да опират в платото. По този начин соковете ще отидат към гърдите и ще ги направят екстра сочни и вкусни.

Roast the chicken at 450 degrees for 20 minutes, then reduce the heat to 400 degrees and continue roasting for about 40 minutes (or until the internal temperature reaches about 175 to 180 degrees F. about 1 hour or a little less).
Read more: http://www.food.com/recipe/kittencals-best-blasted-rapid-roast-whole-chicken-221743#ixzz1m6pA5zGH

Cover with foil and let sit for 15 minutes before slicing (do not slice before that time or the juices will flow out!).
Read more: http://www.food.com/recipe/kittencals-best-blasted-rapid-roast-whole-chicken-221743#ixzz1m6pLz2zo

Пиле с бира

от Ани Цонева

1 пиле
2-3сл масло
1/2 бира - 500мл
3-4 картофа
Приготвяне
Пилето се измива и подсушава. Намазва се с масло и се посолява.
Слага се в намазана с масло тава, полива се с бирата и се покрива с фолио.
Пече се на 220С за 40 мин и се обръща. Пече се още 30мин и се маха фолиото. Допича за още 20мин за да добие коричка.

Съвети

Като видиш, че са му се оголили кокалите, значи се е опекло, и като го боцнеш с вилица, ако се вади месце-значи се е опекло
Ако го печеш комбинирано с картофи-картофите, малко осолени се слагат около пилето поне половин час преди пилето да се е опекло.Тогава, заедно с картофите, слагаш още и 1/2чч вода и олио.

Пълнено пиле с ориз

Кремена Андонова
1 пиле
1 чч ориз
1/2 чч гъби
1/4 чч лук
1/4 чч нарязан бекон на парчеца
4-5 маслини
1чл чубрица
1/2 чл черен пипер
2-3сл зехтин/масло
Приготвяне
Пилето се измива добре отвътре и отвън. Подсушава се  или се оставая да се отцеди.
Лукът се запържва, добавя се оризът и се пържи още 2-3 мин. Добавят се водат; вари се още  3-4 мин и се измества от котлона. Слагат се гъбите, подправките, солта и маслините.  Рразбърква се добре.
Пилето се напълва със сместа и се зашива. Краката му се завързват за да се запази формата.
Слага се в намазана с зехтин/масло тавичка по гръб.Порива се с готварско фолио.  Пече се 40мин на 220С. Обръща се и се пече още 40 мин. Маха се фолиото и се допича още 15 мин до зачервяване.
Съвети

Пилетео се пече се  40 минути за всеки килограм, като добавите още 15 минути за цялостно изпичане. Ако например пилето е два килограма, ще бъде необходимо да печете 80 минути на 180 градуса, След което се маха фолиото и се пече още 15 мин. за да хване златиста коричка. Така времето, необходимо за приготвянето на сочното пиле, ще е 1 час и 35 минути
Като видиш, че са му се оголили кокалите, значи се е опекло, и като го боцнеш с вилица, ако се вади месце-значи се е опекло.

Thursday, February 9, 2012

Aphrodisiac foods

Chocolate
Everybody's favorite female aphrodisiac is chocolate. There seems to be a never ending debate on it's sexual powers but it for fact does contain chemicals that effect neurotransmitters in the brain thought to be related to sexual desire.
The phenyl ethylamine (PEA) in chocolate releases the same hormone released during sexual intercourse. That's why this treat is such a hit during sensual and romantic holidays like Valentine's Day
Read more at Women's Health: http://www.womenshealthmag.com/sex-and-relationships/food-aphrodisiacs#ixzz1ltAeQxOa
Pomegranate
This fruit dates back to Greek mythology as one of the most renowned aphrodisiac foods--especially for the goddess of love. Many cultures use pomegranates as a sexual cure because the juice is rich in antioxidants that increase the blood supply to the genitals.

Read more at Women's Health: http://www.womenshealthmag.com/sex-and-relationships/food-aphrodisiacs#ixzz1ltCpUcBm

Arugula
Documented as a female aphrodisiac as far back as 1000 A.D., the health benefits may outweigh the sexual aid this leafy vegetable provides.

Honey
Even in Egyptian empires honey has long been a sought after delicacy. There is a reason why it's called a Honeymoon.

Asparagus
The sensuous phallic shape of asparagus is probably where this vegetable was promoted into the realm of food aphrodisiacs.
The veggie may look suggestive, and it's high in the vitamin E that stimulates the sex hormones too. This can contribute to an increased sexual appetite
Read more at Women's Health: http://www.womenshealthmag.com/sex-and-relationships/food-aphrodisiacs#ixzz1ltDRWh5Z

Bananas
Another phallic symbol is the banana but the high concentration of B vitamins and potassium are requirements for healthy sexual hormone production.

Pine Nuts
Prized for its ability to aid in both male and female potency Zinc is the magic mineral that is highly concentrated in these delicious nuts used to stimulate libido as far back as the middle ages.

Carrots
Yes, another symbolic representation of the penis carrots like bananas also contain high concentration in vitamins and beta-carotene that aid in hormone development.

Mustard
Thought to increase desire and increase stimulation in the sexual glands this is a usually unthought-of aid.

Strawberries
One of the most erotic fruits on the planet is the strawberry. It's symbolizes the nipple and not only is it delicious but its highly concentrated in vitamin C.

Almond
One of the oldest known and worshiped fertility and sexual stimulant is the notorious almond said to inspire female passion and arousal on top of increasing fertility.

Pineapple
Thought to improve the taste in male semen and rich in vitamins essential to a strong libido.

Vanilla
A very sensual aroma emits from the vanilla bean and there have been numerous myths of how this plant came to be all surrounding female sexuality.

Ginger
This is a powerful circulatory system stimulant that has great impact for both men and women in terms of improving blood flow to sexual organs to greater improve stimulation and sexual arousal.

Red wines
Well, there are two ways alcohol can be used as an aphrodisiac but the positive effects are the antioxidants and nutrition found in red wines.
Moderate amounts of red wine are said to stimulate your sexual desire. The scent of red wine can get women in the mood because it's said to imitate the scent of male pheromones
Read more at Women's Health: http://www.womenshealthmag.com/sex-and-relationships/food-aphrodisiacs#ixzz1ltANLZwQ

Avocado
The sensual look, feel, and taste of this fruit are what put it into play as an ancient Aztecan female libido enhancer.

Basil
Information about basil leads us to this long known herb used as a terrific fertility enhancer this herb has the power to increase response of the sexual organs.

Aniseed
Originally taking its claim as an aphrodisiac from the ancient Greeks and Romans this popular food has long been believed to increase female sexual desire and promote arousal.

Caffeine
This stimulant typically found in coffee or tea is key to improving blood flow to sexual organs and boosting energy levels needed for sexual performance.

Garlic
Obviously not the aroma that is a turn on. Garlic contains anti-oxidants and nutrition vital to maintaining sexual stamina.

cinnamon
This spice has been proven to increase both your physical and sexual appetite. A drop of cinnamon oil rubbed onto the genitals can help produce a powerful sexual stimulation
Read more at Women's Health: http://www.womenshealthmag.com/sex-and-relationships/food-aphrodisiacs#ixzz1ltBGi5qA

Putting it to action!
From the information about these aphrodisiac foods I can assure you that ingesting any of these great foods and herbs is not going to guarantee multiple orgasms combining them together and crafting sensual meal recipes is a perfect way to set the mood for the rest of the evening. For example take a look at this menu of great food and tell me that you wouldn't at least enjoy a wonderful dinner:

Salad with fresh arugula, carrots, and aniseed with ginger-garlic dressing

Pasta tossed with pesto (pine nuts, basil, and garlic)

A fine glass of Merlot to enjoy dinner with

Light dessert of dark chocolate dipped strawberries and pineapple served with almonds

Followed by an espresso, cappuccino, or cup of coffee

Nothing odd tasting or weird in appearance in that menu and we've managed to combine almost 15 known aphrodisiac foods including essential nutrients, vitamins, stimulants that together form a female sexual enhancer served up on the dinner table. It doesn't need to stop here. Click on to the next category of female aphrodisiacs for even more information and ways to improve female libido.